Blogging 101- Hosting Setup and Installing WordPress
Updated on: by Miranda Grimm

Need Easy Extra $350+/Month For Free?
- SwagBucks: Watch videos, take surveys, shop and more to earn real money. Earn up to $35 per survey! No hidden fees and completely free. Join Swagbucks Now to Get $5 Free
- InboxDollars: Has so far paid its members over $40 Million. Watch videos, take surveys, shop and more. Join InboxDollars Now and Get Free $5
- SurveyJunkie: Make $5-$25 in your spare time from home to take online surveys, participating in a Focus Groups and trying new products. Join SurveyJunkie Now
- Branded Surveys: Complete online surveys. Collect points. Redeem your points for cash & gift cards. No hidden fees and completely free! Has so far paid its members over $18 Million. Join Branded Surveys Now
Yesterday we talked about choosing a hosting company. Today we will talk about setting up your hosting and how to install WordPress. My experience is with Hostgator, therefore I will be using their platform through this discussion. Most hosting companies are very similar to Hostgator so you should still be able to use this as a guide.
What you need to have ready:
Your cPanel login information for Hostgator and your GoDaddy domain account information
Go ahead and log into your Hostgator Control Panel (the login information should have been emailed to you.
We will now need to direct your URL to your host space.
Most likely the email you received from Hostgator containing your account information will also include 2 different ‘name servers’ url addresses. You can also find this information in your Host Gator Control Panel on the left side, possibly toward the very bottom:
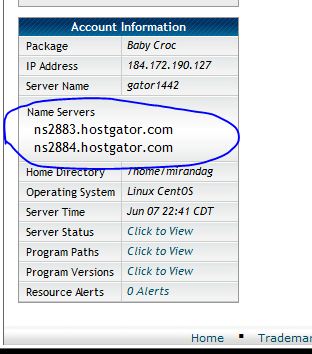
You will want to take your nameserver information over to GoDaddy (or where you purchased a domain name).
We will now tell GoDaddy where you will be using the domain name you purchased.
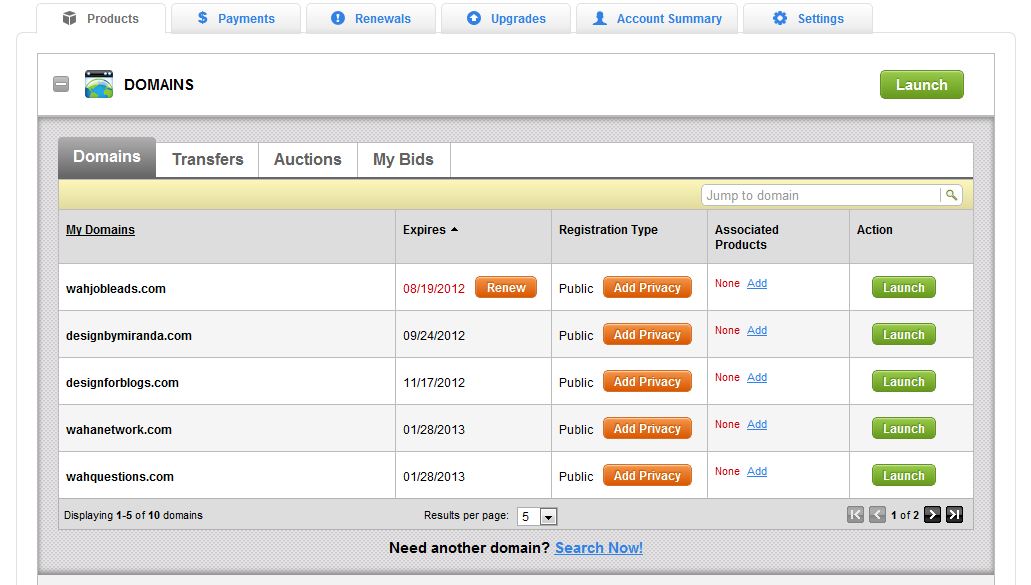
Log into GoDaddy and go to the ‘MyAccount’ and look for the ‘Domains’ Section.
You will want to click the green ‘launch’ button beside your domain name.
Need Easy Extra Cash?
Pinecone Research, a leading name in online survey panel honesty, absolutely guarantees $3 cash for every survey you complete!
Take advantage of their time limited New Membership drive and register NOW. Join today: 100% free!
Join Pinecone Research Now
Once the new page loads you will look for a section called Nameservers.
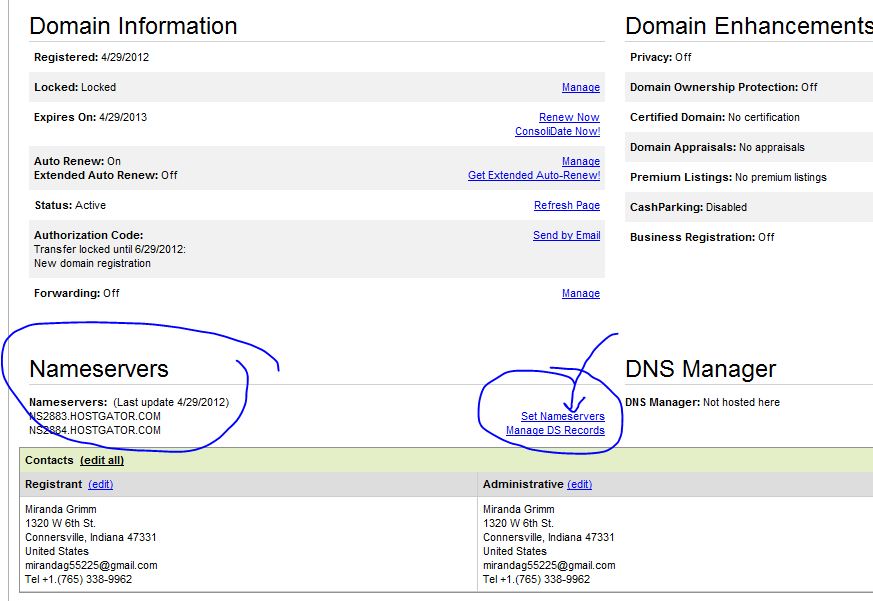
Click the Set Nameservers link (circled with an arrow pointing to it in the above image).
A new window will pop up.
Select the “I have specific nameservers for my domains.” radio button.
Then, place the two nameserver urls you got from Hostgator. (Even though there are four spaces for nameservers you only have two.)
Press OKAY and you are done with GoDaddy!
Now it’s time to tell HostGator what your Domain name is!
Go back to the HostGator Control Panel
Under the Domains Section you will want to click on the “Addon Domains” icon pictured here:
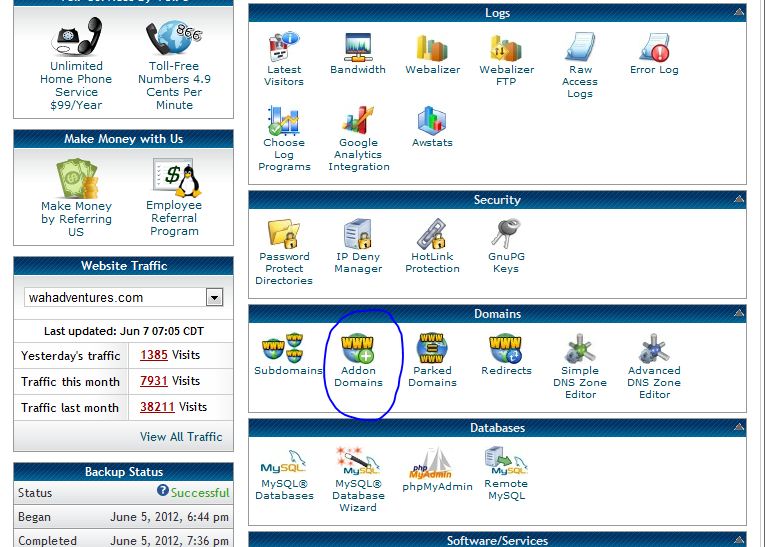
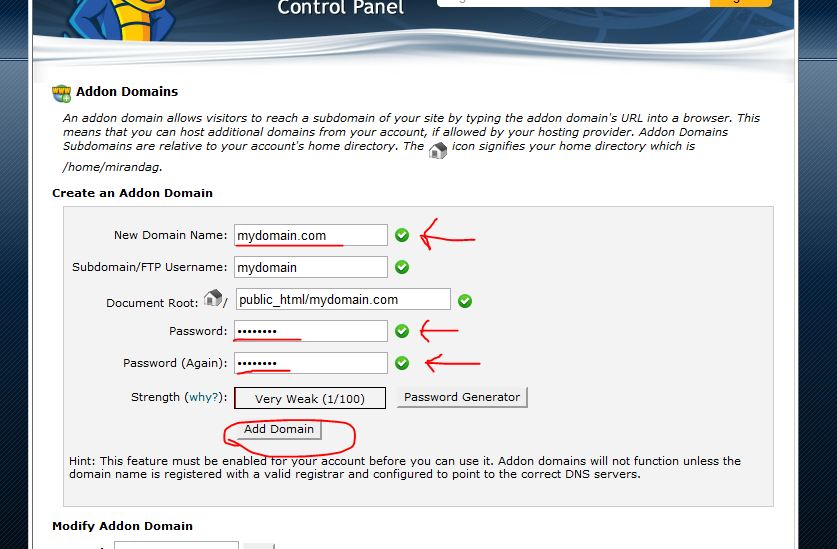
After clicking the Addon Domain button a new page will open. You will want to type in your domain name in the first box, the second and third box will auto-fill, you can just leave them alone. You will need to put in your password of choice, verify it and hit “Add Domain”.
Now let’s install WordPress into your WebSpace!
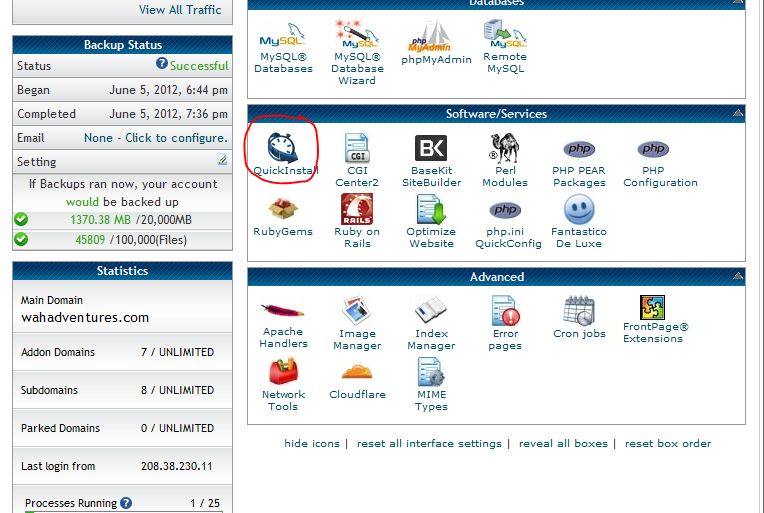
Go back to the HostGator Control Panel. Look for the Software/Services section and click on the QuickInstall Icon (as pictured below).
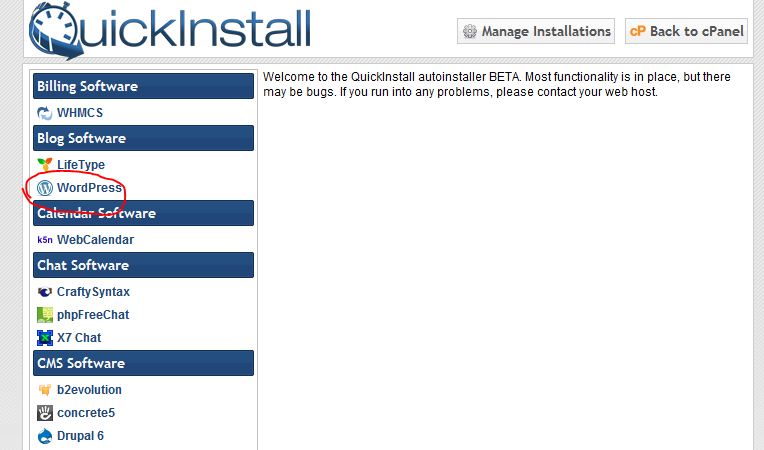
Once the new page loads you will see all the different types of software you can download into your server space to make websites! You probably didn’t realize you had so many choices! For this tutorial we are using WordPress, so under the blog section choose WordPress. (pictured below)
Hit the Continue Button
Type in your domain name, the email address you would like to use, your user name, what you want to call your blog and your name.
Then hit Install Now!
Now, in a few hours (***It can take several hours for GoDaddy and Hostgator to work together. ) You will be able to visit your Blog Domain name or URL and see a welcome page from WordPress! You will also be receiving log-in information in your email box with directions and a password to access your WordPress Dashboard!
Look around inside your WordPress Dashboard. Get comfortable because next week we will be setting up the basic or general settings of WordPress!
Related Posts:
- Blogging 101- Starting a WordPress Blog
- How to Choose a Blog Domain Name- Blogging 101
- How to Buy Your Own Domain Name
- How to Add your Domain Name to Blogger- Blogging 101 Series
- 15 Best Hosting Plans for Bloggers
Earn Everything… nearly!
Join Ipsos iSay, one of the few Faithful and Honest survey panels and earn prizes, gift cards and donations. Stack your points and redeem them: Simple! No hidden fees and completely free!






Comments
Click here to post a comment...
Post comment