How I Turn $3 Into $30 With Used Items
Updated on: by Miranda Grimm
 I have a special skill I would love to share with you. This skill is something anyone can learn to do and it is a quick way to turn old items into new while making quick cash.
Need Easy Extra $350+/Month For Free?
- SwagBucks: Watch videos, take surveys, shop and more to earn real money. Earn up to $35 per survey! No hidden fees and completely free. Join Swagbucks Now to Get $5 Free
- InboxDollars: Has so far paid its members over $40 Million. Watch videos, take surveys, shop and more. Join InboxDollars Now and Get Free $5
- SurveyJunkie: Make $5-$25 in your spare time from home to take online surveys, participating in a Focus Groups and trying new products. Join SurveyJunkie Now
- Branded Surveys: Complete online surveys. Collect points. Redeem your points for cash & gift cards. No hidden fees and completely free! Has so far paid its members over $18 Million. Join Branded Surveys Now
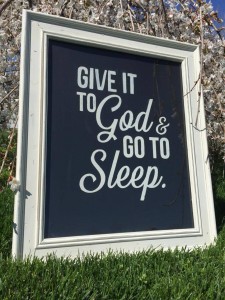
Pick up old picture frames at vintage stores like Goodwill or maybe out of your own shed or garage. Then with your printer, paint and some sandpaper you can have something like this, which can quickly sell on your local Facebook sales page for $30!
Bear with me. I know what you are thinking. But you do not have to be an artistic person to do this! Trust me. Give it a try. I will make an easy tutorial below for you to follow. Additionally, I am going to provide you with a FREE print out of this design! It’s never been easier! I have found a lot of success with this and have even been making a substantial income alongside my husband on Facebook selling signs and other projects just like this!
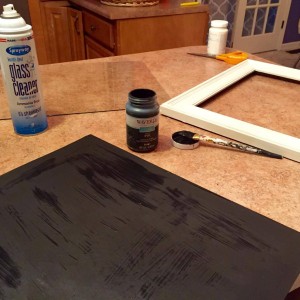
Materials to Begin
Keep in mind, your first project will require the most investment in materials. Hopefully you already have some of this around your house. I will list what is needed as well as an approximate of what you can expect to spend if you have to buy it first.
- Old Picture with Frame and Glass: $3
- Matte/Chalky Distressing Paint: (Black and White) $6 each
(I like the Waverly brand in the craft department of most Walmarts) - Paint Brushes: $3
- Cardstock: $5
- Sandpaper (22o grit is ideal): $2
- Xacto knife: $5
Total Initial Cost: $30 plus the cost of ink used to print your design on a sheet of card-stock paper.
If you have to pay for all of your initial supplies up front, then your first picture will cover all of your expenses after it sells. This particular design, which I will provide in a pdf print file at the bottom of this article, has had a history of selling very easily and very quickly!
Tip: I suggest Chalk Paint (not to be confused with chalkBOARD paint). Chalk paint requires very little, usually absolutely no prep work before painting nearly any surface. It also usually covers very well and has a nice matte finish. Distressing is easy and can be layered for some beautiful and creative distressing techniques.
Get Started
I would first begin by taking apart your picture, frame and glass. Set aside the pieces and clean each. Using your white, or off-white color that you have chosen in your chalk distressing paint, paint the entire frame smoothly and evenly. It will most likely need two layers of paint. After the first layer, I would allow to site for about 15 minutes and then apply the second layer.
Keep in mind, the frame doesn’t need to be covered perfectly since it will be distressed later.
While the frame dries, use your black chalk paint to cover the cardboard or original image that was framed. Sometimes this requires more than one coat to fully cover whatever image was previously there.
Although it may seem like a good idea to paint the blank cardboard side of the print, I like to leave it alone so that when you sell it to your customer, you still have a blank side showing on the back and not your original ugly print.
Let dry.
Tip: Many frames come with the back completely covered with a thin paper cardboard. Just rip it off to expose the traditional back-side of the frame.
Design and Print
While your paint is drying you can use this time to prepare your design. You can use whatever you want, or you can use this design I am providing for you here- FREE PDF PRINT FILE. This is on an 8.5 by 11 inch layout for you to print onto the card-stock paper mentioned earlier.
Need Easy Extra Cash?
Pinecone Research, a leading name in online survey panel honesty, absolutely guarantees $3 cash for every survey you complete!
Take advantage of their time limited New Membership drive and register NOW. Join today: 100% free!
Join Pinecone Research Now
However, depending on the size of your frame. It is possible this size is too small or even too big. You may want to change the size depending on your frame. You may want to print onto more than one piece of paper. However, keep in mind your printer likely has a standard margin. You will need to get creative and possibly cut it off or work around. Everyone’s printer will be different but I am sure you can make it work.
Tip: Only print out the outline of your design to save your ink.
Cut Out the Design
Once you have printed out your design, get your xacto knife ready. Now, you will carefully cut out each letter.
Notice I have prepared the letters so that the inner parts of your letters will remain. Therefore you will need to hand draw in the gaps yourself.
Tip: After finding a lot of success with this, I invested in a Silhouette Cameo machine to cut out the stencils so I no longer have to use the Xacto knife myself.
Stencil the Design onto Your Picture
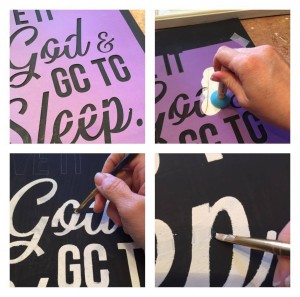
Fit the stencil you just cut out onto the dried canvas. Tape it down into place so it doesn’t shift.
Using a pencil, trace out the design and remove the stencil.
You will likely need to go back through and touch up and areas your pencil missed.
Paint the Design
Now, using the same paint you painted the frame with and a small paint brush, carefully fill in the letters with the paint.
If you go outside of your lines, you can let it dry and later come back with the black paint and clean it up.
TIP: You could always use a stenciling sponge and keep the stencil in place and sponge the paint onto the canvas. This saves a lot of time, but most likely will require you to go back through and touch up quite a bit.
Distress the Frame
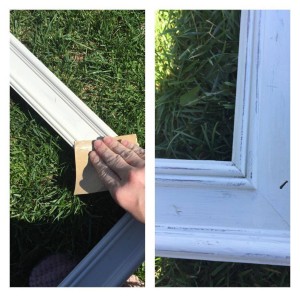
While your design is drying, take your sandpaper and distress the frame as much as you would like.
Using a clean towel, be sure to remove the dust before putting the picture, glass and frame back together.
Sell It!
Now take a photo of your painting and post it online for sale! Be sure to follow safety rules when meeting people in public to make transactions. Common sense and bright lights are good things to keep around.
Tips for Success
- If you enjoy this and have as much success with it as I have, I highly recommend investing some of your profits into a Silhouette Cameo or a Cricut machine. Just research each product before making a choice, they both have positive and negatives. I only have experience with the Cameo and I love it. But the Cricut may be equally as great.
- Share your creative works with your Facebook friends but don’t get all salesman/woman with them! I bet your friends will love to see what you are up to and I bet a few friends will ask you to make them a sign or two. But if you start being all sales pitchy on them, you’re gonna lose a lot of friends. Trust me on this.
- Remember your competition and price to sell. The unfortunate part of all of this is that your competition are places that can sell similar pieces for dirt cheap. So if you are going to charge high prices for your work, be sure it is unique enough that people cannot find it anywhere else! Otherwise, you are gonna be sitting on a lot of work that just doesn’t sell. Every market is different, play around with your prices and see what works for your area and for your time too.
- Watch for deals/clearances. Goodwill in my area has half off every first Saturday of the month. It’s a great day to make my way through the crowd and stock up on frames for half the price. I know it’s only saving a dollar or two, but in this business and this market, that really does make a difference. Same with supplies, coupons and clearance items are your friends! Any way that you can save on your cost, just means more of a profit in the end.
Good luck on your adventure! I hope this inspires a few of you to give this a try. It has been a wildly successful way for me and my family to bring in some additional income. If you would like to check out some of the additional projects my husband and I have been working on, please visit our Facebook Page, Grimm Customs and browse our photos.
Related Posts:
- How to Turn Your Artistic Talent into a Home-Based Business
- Turn Tears into Treasure: How Onion Farmers are Cashing in on the Crying Game
- How Much of My Paycheck Should I Save?
- How I Earn $20 an Hour with Demand Media TQA
- “How Can I Get Free Air for Tires Near Me?”: 12 Ways to Find It!
Earn Everything… nearly!
Join Ipsos iSay, one of the few Faithful and Honest survey panels and earn prizes, gift cards and donations. Stack your points and redeem them: Simple! No hidden fees and completely free!


Comments
Click here to post a comment...
Post comment
Corina Ramos
March 30, 2016 at 5:05 pm
Hi Miranda,
Wow, turning $3 into $30 is not bad at all. Thanks for showing us how you did it, very creative.
Erica
April 13, 2016 at 12:50 pm
Great post Miranda – you may want to consider making a YouTube video showing the process too, if you haven’t already.